
 Yes, I bake too!! You didn’t think I could just make entries without making desserts did you?? This recipe was handed down to me by my Mother and she will be the first one to tell you we do NOT make it the same way. Why you ask? Because I do not have anywhere near the patience she has. My motto is if it tastes the same let’s let the modern world of electricity help! I am making this for a very special co-worker of mine. You will need all of the ingredients below and 1 large 9 inch spring form pan:
Filling:
- 4 bars of Philadelphia Cream Cheese (I think it’s the best)
- 16oz container of sour cream ( I like Breakstones and the new Kraft Simply Sour Cream)
- 1 cup of granulated sugar
- 1 tsp pure vanilla extract
- 4 eggs
- 1 bag of chocolate chips (choose between milk or dark) (Melted)
Crust:
- 1 1/2 cups of graham cracker crumbs ( I am using the chocolate graham crackers)
- 1/2 stick of butter
- 2 Tbs of sugar * only if you are using plain graham crumbs. No need to add if using the chocolate grahams.
10-12 chocolate covered strawberries for decoration on top. Simply get some good melting chocolate you can get this in the grocery store in produce, melt as directed and dip cleaned dry strawberries then lie on wax paper to let harden for decorating.
So let me start off by saying that you will want to set out the cold ingredients at least an hour before you get started. I leave out the cream cheese, sour cream and butter I don’t worry about the eggs as they mix fine straight from the refrigerator.

We will start with mixing the crust. We first need to crush the graham crackers. By the way, plain works just as well for this. Place the butter in a small bowl and microwave on low until melted and set aside. Combine 9 whole crackers ( it is one wrapped package out of the box) in a food processor with the sugar and blend. If you don’t have a food processor, you can put them in a plastic freezer bag and start pounding! When pulverized, pour into a bowl and add the melted butter. Once mixed, pour this right into the spring form pan and press into the edges of the pan, forming a nice crust on the bottom. Set aside and preheat oven to 350 degrees.

In your KitchenAid or a large bowl ( this is where my mother and I differ. She mixes everything by hand with that wooden spoon of hers, but I bought my KitchenAid to do the work for me). Add the softened cream cheese, sugar and vanilla extract. Beat on low then switch to medium until blended, scraping the sides if needed. You want it to be nice and smooth. Then add each egg one by one until each is blended. When all ingredients are blended, stop the mixer and add the sour cream. Return mixer to low to fold in the sour cream and you’re done! Do not over mix. While this is mixing you can melt your chocolate. Pour the bag into a glass bowl and microwave for 30 second intervals stirring between each until nicely melted.


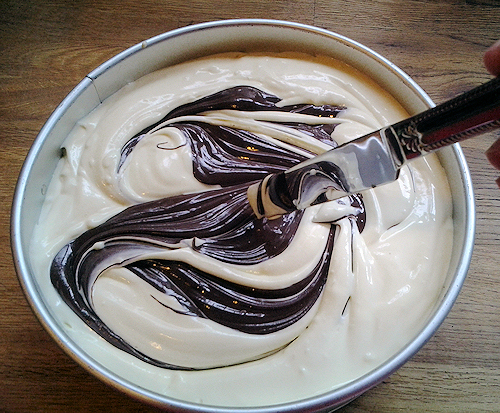
 It is time to add the mix to the pan. Pour the mixture right in. Then grab your bowl of melted chocolate and pour that into the pan right on top. You are going to take a knife and slide this through the filling carefully not to nick the crust at the bottom.

When this is baked the top will be Chocolate and the bottom Vanilla(You’ll see! Don’t scroll down yet, we’re not done!) When you’re finished swirling, take your spatula and smooth out the top.

It is ready to place in the oven for approx. 1.5 hour it may be a little less depending on your oven temp. When it’s done, look for it to be not too firm but definitely not too jiggly. I can give you temperatures:(The ideal temperature for a cheesecake is around 160 to 165 degrees) but to tell you the truth I have never used that. The truth is that it is trial and error and each will be different until you find your favorite texture. But the 1hour 1/2 mark will ensure it’s done and I used this yesterday and it was perfect! I also place a large pan of water in the oven for a little extra moisture. When finished, turn off the oven, but allow it to remain sitting there for about 20min to cool down, then gently pull it out. Slide her right into the fridge and let it set overnight. NO LESS is advised. Trust me on this … if you listen to nothing else I have said, listen to this: let it set OVERNIGHT. OK! let’s see how it turned out!!  I KNOW what you’re thinking! “WOW that’s an ugly cheesecake!” lol Well, yes they all are until you fix ’em up!! So let’s get started. About an hour before you are going to serve this up, you take a hot wet knife and glide it over the cracks you will see it start to magically heal itself and get smooth again! Decorate it anyway you like on top, drizzle chocolate, add gnache, put fresh berries on it … there is no right or wrong way to decorate! Carmel would be decadent on this as well. Here is what I did, and see I told you it’s all pretty in the end!!! Need more details on this, just email me and I’ll be happy to post more pictures. I’ll just have to make another. *wink*.
AND THIS is what it looked like within the first 3min of bringing it into the office lol. The husband got none and he was none too happy, but after all this was for a special co-worker, not the husband, and she loved it!

looks great! nice fix, btw. lucky co-worker!
Incredible and beautiful.
This looks decadent!
Very much so but in the big scheme of things not as much sugar as a chocolate cake 🙂
Which is always a good thing!